Overworld Part 2 (Shrine of Osiris & Khepri Amphitheater)
Shrine of Osiris
Back at the Shrine
You end up on the circular platform in front of the tomb. Return to the shrine for a cutscene. You can see a timebomb dropping somewhere. Do you notice the large chest just in front of the shrine? This is the Community Chest, it's where you can pick up DLC content and community rewards.Timebomb
Time to get the next piece. Remember, if you don't know where to go next, find one of the statues and use the staff to ask for directions. But for now we have a general idea; we have to find that timebomb. Run up the stairs left of the shrines altar to find it.Red Skull (2/10):
On the nearby column you can see a red skull. Roll the timebomb towards the column and use it to get up there and grab the Red Skull #2.
Then roll the timebomb towards the bricked-up wall and let it detonate.
Step through and follow the path. Head up the stairs and you come upon the first optional Challenge Tomb.
Challenge Tomb (1):
Head inside the challenge tomb. At the bottom of the stairs you come upon a water passage with a spike gate blocking the path. Left and right are two spike fields with most spikes retracted (the plates with skulls on them) and two pressure plates on each side. You have to step on both pressure plates to open the gate, but beware, once you step onto a square with a skull the spikes will come shooting out after a short delay. So do not hesitate while making your way through. You can rest on the pressure plates until all spikes are retracted again, or, if you are in a hurry, you can follow the path outlined in the map #1.
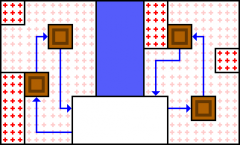 Map #1
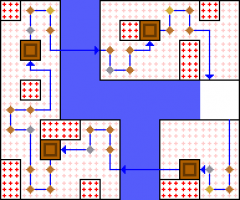 Map #2
Once the gate is open, swim through. In the next room another similar puzzle awaits you. Here you have to step on four pressure plates on two different sides of the water.
Swim over to the right side where you can leave the water and gain access to the spike field.
You can once again take your time and tackle one plate after the other or you could find an optimised path (like the one indicated in map #2) and collect all gems on the way. Either way you need to jump across the water at least once to reach the left side where two plates are. You can skip the jump back by dropping into the water instead and swimming over to the right again.
Once all four plates have been stepped upon, the next spike gate opens up, granting you access to the tomb's inner sanctum.
Collect the Bolt Action Rifle and the Max Health Upgrade. You can also use a bomb on the sarcophagus, but there was never anything inside for me.
Swim all the way back to the entrance and leave.
Map #2
Once the gate is open, swim through. In the next room another similar puzzle awaits you. Here you have to step on four pressure plates on two different sides of the water.
Swim over to the right side where you can leave the water and gain access to the spike field.
You can once again take your time and tackle one plate after the other or you could find an optimised path (like the one indicated in map #2) and collect all gems on the way. Either way you need to jump across the water at least once to reach the left side where two plates are. You can skip the jump back by dropping into the water instead and swimming over to the right again.
Once all four plates have been stepped upon, the next spike gate opens up, granting you access to the tomb's inner sanctum.
Collect the Bolt Action Rifle and the Max Health Upgrade. You can also use a bomb on the sarcophagus, but there was never anything inside for me.
Swim all the way back to the entrance and leave.
 Map #1
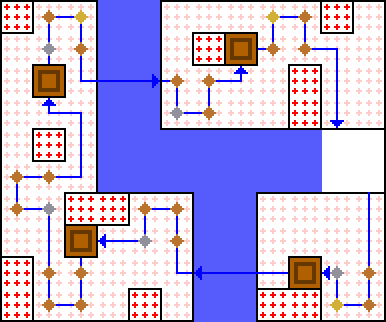 Map #2
Path to the Khepri Amphitheater
Let's continue the path to the Tomb of the Silversmith. Turn to Lara's right, which is to the left side of the screen.Red Skull (3/10):
Once you leave the columned passage behind you, go to the left side, the bottom-left corner of the screen. There you can see the next Red Skull #3 on a wooden scaffolding.
Hop down to collect it and climb back up again.
Continue along the stone bridge. Part of it collapses and on the other side appear two regular skeletons with bow and a fire skeleton with bow. Hop across the gap to where you find some gems.
Khepri Amphitheater
Amphitheater Fight
Step past the open spike gate to reach the Khepri Amphitheater. Before you step into the inner circle, look to the left of the stairs leading down to find an Ammo Cache that refills your ammunition. When you approach the arena in the centre, you will find that Set has set another trap for you. Stand on either of the two rotating Osiris glyphs and use the staff to raise up the spiked column. From here hop on top of the columned stone cage holding a sun ball. Place a bomb on top, hop down and detonate the bomb. You will be attacked by green scarabs, fire scarabs, a fire skeleton with sword and a regular skeleton with sword. The second wave consists of more fire scarabs and green scarabs. The rotating pillars return and now there are three of them. Again stand on one and raise it using the staff. Place another bomb atop the stone cage and detonate it after hopping down again. The fire scarabs and green scarabs are accompanied by a large fire skeleton with sword. After the large baddy is beaten, you are confronted with more fire scarabs, green scarabs and a regular skeleton with sword. Note that there are now two spiked columns rotating around the stone cage. On the outer ring are two retracted spiked columns with glyphs. Stand on one, raise it up and wait for the right moment to hop over to one of the extended spiked columns. From there continue to the stone cage to drop the third bomb. Again detonate it after you've vacated the blast radius. This will release the sun ball. Roll it towards the top of the screen to find a cage that will hold it left of the entrance to the Tomb of the Silversmith. This will open the door.Amphitheater Collectibles
But before we enter, there is still stuff to collect.Red Skull (1/5):
Just to the right of the entrance to the Tomb of the Silversmith you find a tall pillar with a red skull atop. Approach the wooden scaffolding at the outer wall and climb onto it on either end, climb further up onto the middle part and from there take a running jump towards the pillar, to grab the Red Skull #1. Hop back down.
Red Skull (2/5):
Follow the circle around clockwise, past the entrance and the ammo cache to find another wooden scaffold at the bottom of the screen. Climb up to grab the Red Skull #2 and some gems.
Red Skull (3/5):
Step through the open spike gate to the left, at the bottom of the screen. There immediately - before stepping through the arch - head up the narrow stairs to Lara's right. Collect the Red Skull #3 among some gems.
Get back down the stairs.
Red Skull (4/5):
Continue further along the path towards the bottom of the screen, through the arch and through the lowered spike gate.
At the bottom of the stairs, turn left.
If you head down the stairs to the left you will find a tall pillar at the end of the ledge with a red skull atop. You cannot reach it from here however, so stay on the upper ledge and run to the end.
You will come past another direction-giving Osiris statue atop a small pyramid and an entrance behind it which we will ignore for now.
Instead approach the edge. From the green bush that a running jump straight ahead and with a little luck you will land on the pillar and collect the Red Skull #4. Return to the upper ledge.
Challenge Tomb (2):
Enter the challenge tomb. Stand on the raising block and raise it up using the Staff of Osiris. Hop up towards the right platform.
Use the Staff of Osiris to slow time.
Now for a short intermezzo, to get some gems, grab the bomb roll it over the edge where you came up and roll it up towards the high wall at the end of the passage, above which you can see a circle of gems. Use the timebomb to stand upon and reach that ledge, to collect the gems. You can then let the timebomb detonate; you will get another. Hop back down and use the the raising block to get back to where the timebomb spawns.
Again, slow down time, grab the new timebomb and roll it towards the jutting wooden ledge. Place a bomb where the black smudge is and detonate it to catapult the timebomb over to the other side. Jump across and roll the timebomb onto the pressure plate to turn off the burners. Again place a bomb behind it. Run past the extinguished burners and then detonate the remote bomb to get the timebomb over to your side. Roll it onto the wooden jutting ledge, place a bomb and detonate it, to catapult it back to the right side. Roll the timebomb onto the square platform by the high wall. Place a bomb on the square platform, behind the timebomb when looking at the wall. Jump atop the bomb and from there grab the ledge above and pull up. Stand on the pressure plate to trigger the raising block underneath time and remote bomb. Detonate the bomb to catapult the timebomb off the platform and onto the higher ledge you're standing on. Now roll the timebomb towards the bricked-up entrance and stand clear of the blast radius. Step through to collect the gems, the High Powered Assault Rifle and the Max Ammo Upgrade. After that, you are free to leave the challenge tomb again.
Red Skull (5/5):
Now run up the stairs to the left of the entrance of the challenge tomb.
This will lead you to a new larger area with two circular pits, and a Health Shrine atop an arch of stairs, there are also three treasure chests of varying worth and countless gems to collect.
The final red skull of the area sits atop a column in the left part. Grab the golden rolling ball and roll it over towards the column with the skull on top. Use it to reach the top and grab the Red Skull #5. As a reward for collecting all red skulls of the area, you will receive the Max Ammo Upgrade. Hop back down.
Max Health Upgrade:
Now transport the ball up the stairs towards the health shrine, using a remote bomb. Place it on the shrine climb atop and from there hop towards the Max Health Upgrade held up by the statue. Now find the second set of stairs on the right side of the area and head down, to circumvent the area with the challenge tomb completely. Run up the short set of broad stairs opposite and follow the next stairs back to the Amphitheater.
Max Ammo Upgrade:
Back at the Amphitheater, head up the stairs left of the Tomb of the Silversmith and from there hop up onto the arch atop the tomb's entrance. Grab the gems here and then use the grapple to ascend to the Max Ammo Upgrade floating above your head. Get back down.
Finally make sure you've cleared the area of gems; including the elevated wooden walkway surrounding the arena and the stone steps towards the top of the screen.
Return to the entrance to the Tomb of the Silversmith and step through.© www.tombraidergirl.com Personal use only, no reproduction. Last changes: 09 Dec 2017, 00:47

I do my best thinking plunging off cliffs.